Once you’ve got the WinSEO app installed, you’ll be greeted with a super friendly walkthrough! It’ll guide you through setting up all our SEO features, step-by-step. Seriously, it’s a breeze!
Ready to dive in?
Table of Contents
Initial steps with WinnSEO
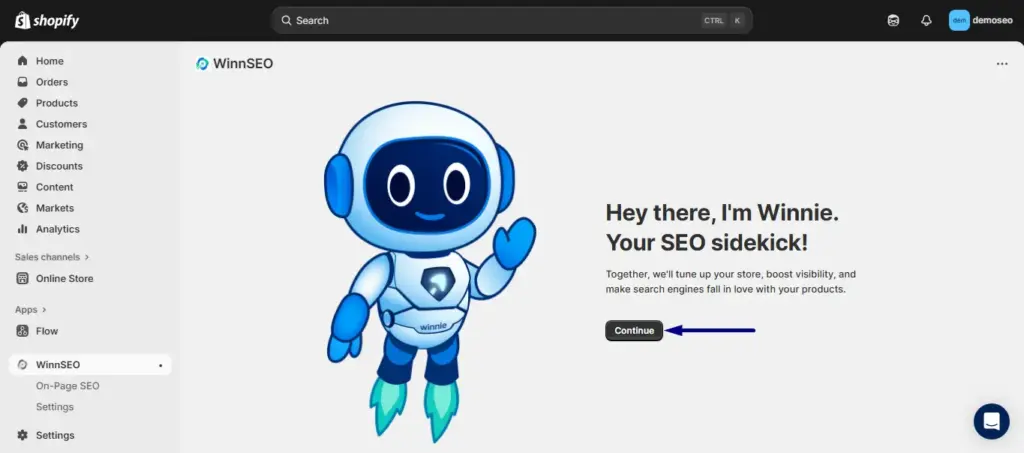
Your friendly buddy Winnie will pop up with a warm hello!
Just hit the Continue button to dive right in.
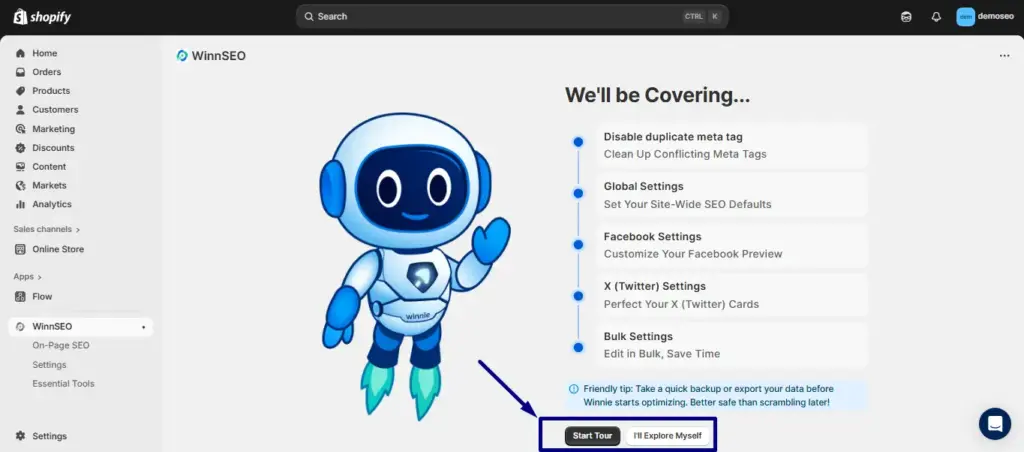
Your pick!
You can hit Start Tour to get a guided walkthrough step-by-step. Or, if you’re feeling adventurous, just press I’ll Explore Myself, it’ll take you to the dashboard from where you can explore the settings yourself.
Here you can see all the setting options. Let’s start!
STEP 1: Theme Integrations
You’ll see that App Embed is already switched on for you.
And speaking of settings, the Duplicate Meta Tags option will be set to Disabled by default, which is actually what we suggest!
Why? Because keeping them off helps stop search engines from getting confused. It ensures your site gets found and ranked better.
Once you’re happy with everything, just press that Save & Next button!

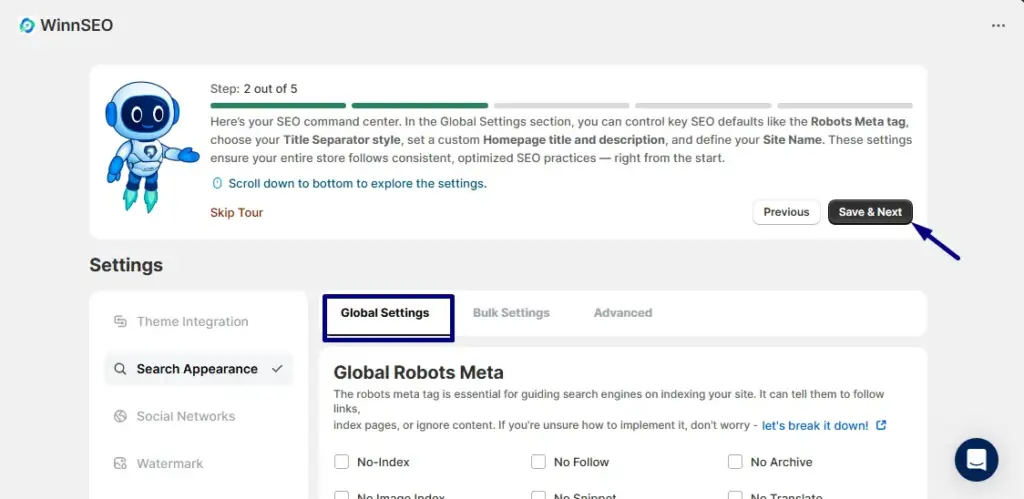
STEP 2: Global Settings
From here, you’ll control how search engine robots will interact with your website.
- Global Robots Meta: Can you see the set of checkboxes and simple input fields? These let you control website Google shows in search results, how much information search engines display, whether search engines follow links on a page and so on. However, with the advanced robots meta options, you can change the snippets and image previews. For the image preview, Large is selected by default but you can absolutely change it using the drop down menu.
After making the changes press Save & Next .
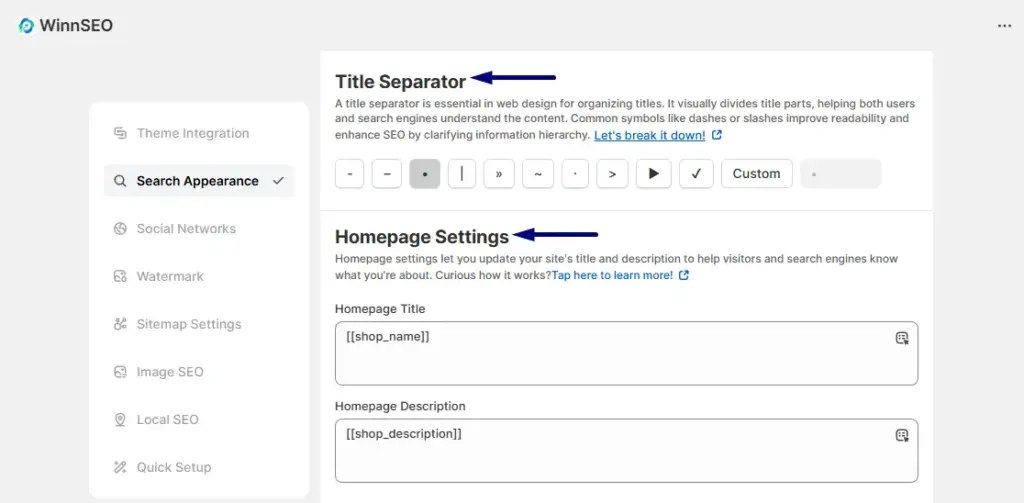
- Title Separator: This little setting lets you pick a cool symbol to separate parts of your website’s titles like hyphens, pipes, tildes, and arrows.
- Homepage Settings: Here’s where you can set your homepage’s title and description. Think of it as your website’s friendly introduction to everyone, including search engines!
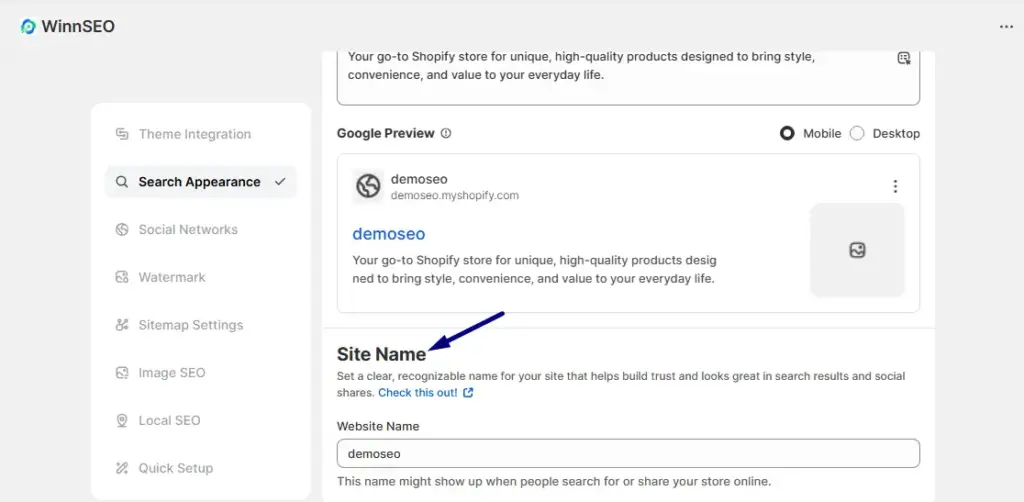
- Site Name: You’ll set your store name using this option. It helps folks recognize your brand and looks great when you show up in search results!
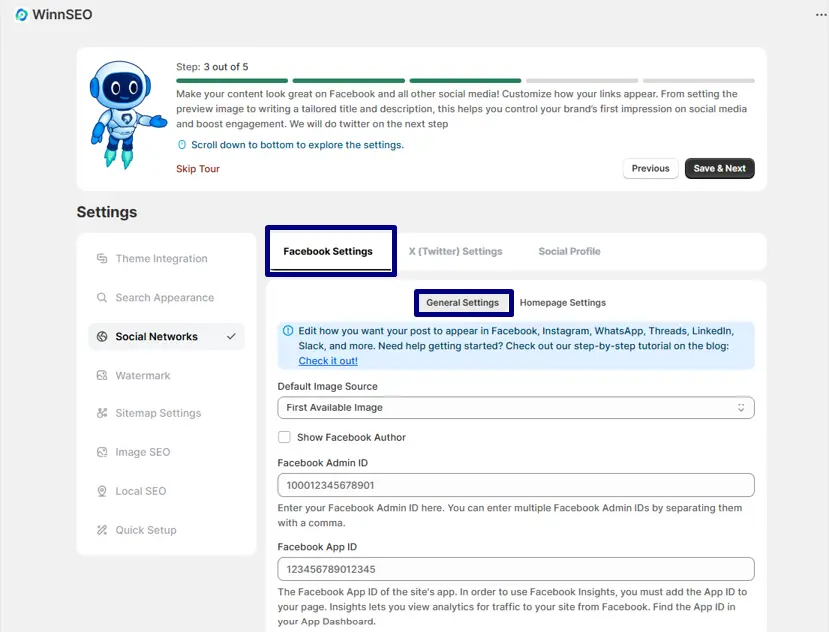
STEP 3: Facebook Settings
Under Social Networks settings you’ll find Facebook and twitter settings.
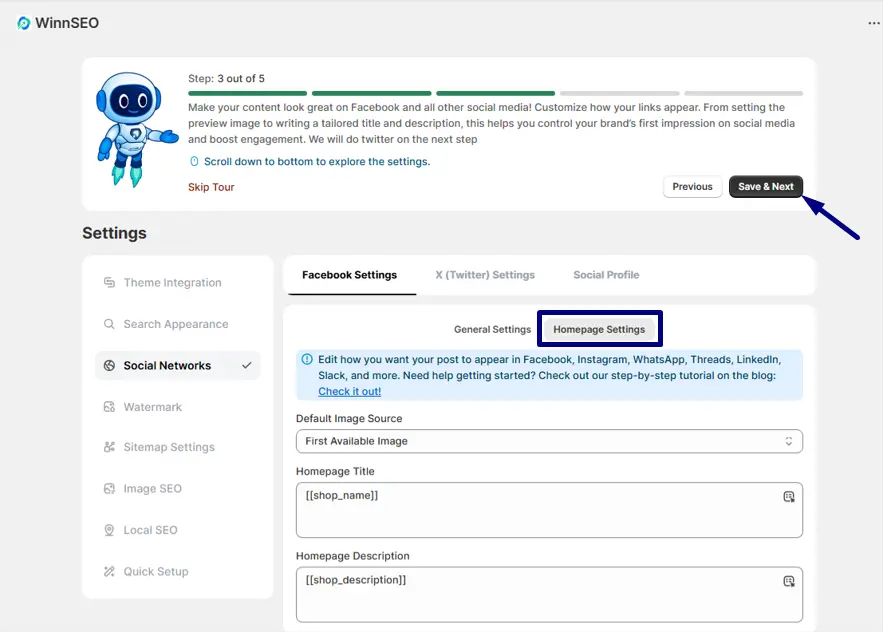
The Facebook settings allows you customize your social posts, share cool updates, and dive into fun communities on social networks. It’s divided into two settings, General Settings and Homepage Settings.
General Settings: This spot helps you control how your stuff looks when people share it on Facebook, Instagram, and more. You can manage the default image source, add admin ID or app ID to ensure your links always look their best.
Homepage Settings: Want your main page to shine on social media? Here’s where you select a default image source, set a special title and description just for your homepage when it gets shared on Facebook!
For details, check out this documentation: Facebook Settings of WinnSEO Social Networks
Step 3 is completed, you can move to the next step now.
STEP 4: Twitter Settings
Similar to Facebook there are also two settings for twitter.
General Settings: This is your spot to control how the posts appear on X (Twitter), from the image to the card style you can make them look awesome.
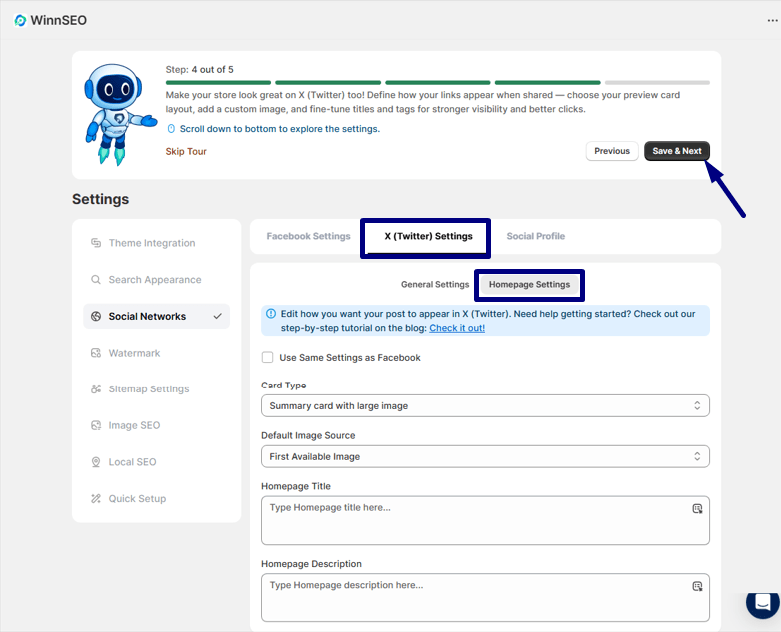
Homepage Settings: Hey! make sure your homepage also shine on X (Twitter)! Here, you can set a custom title and description specifically for when your main page is shared there.
You can find further details in the documentation: X (Twitter) Settings of WinnSEO Social Networks
Your step 4 is completed. Click on the Save & Next button.
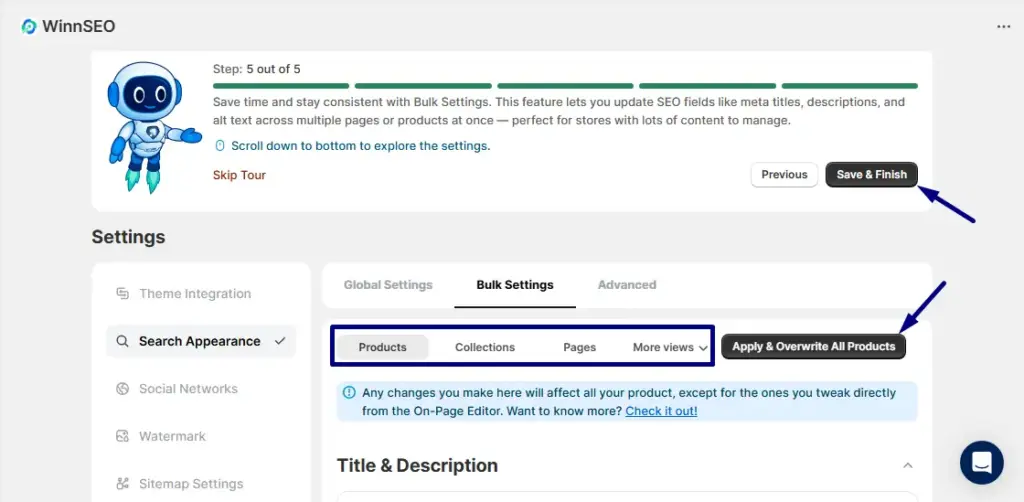
STEP 5: Bulk Settings
You’re almost there! This is the last step.
Imagine needing to change something on lots of your products, blog posts, or pages all at once, that’s what Bulk Settings are for! Instead of editing each one individually, you can apply changes across many items here.
Now, with Bulk Settings, you can apply all the settings you explored earlier to individual content types like products, collections, pages, blogs, and blog posts.
It’s super handy, save you a ton of time for mass updates!
After all the changes you’ve made, you have to press the button Save & Finish to wrap up the tour.
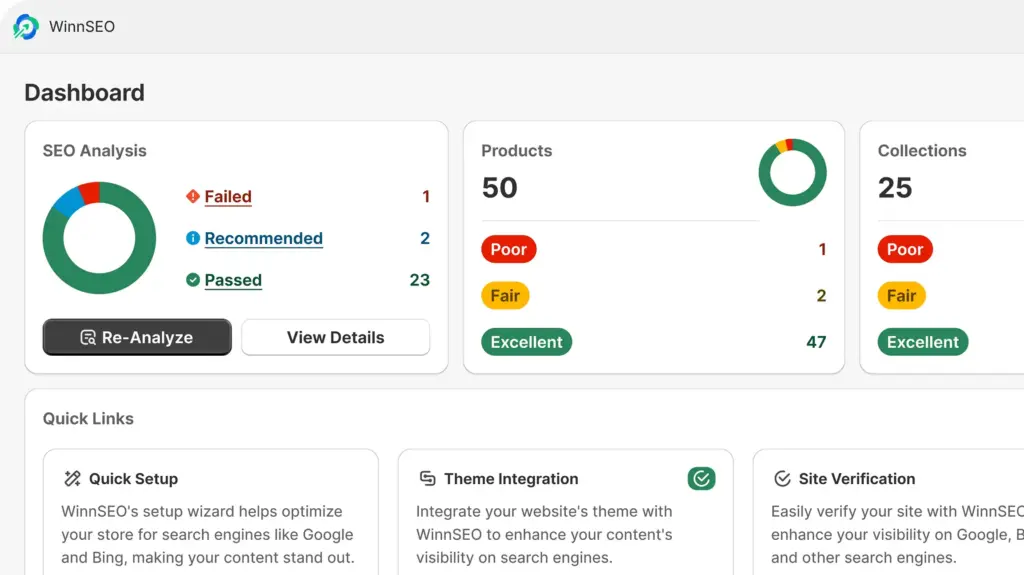
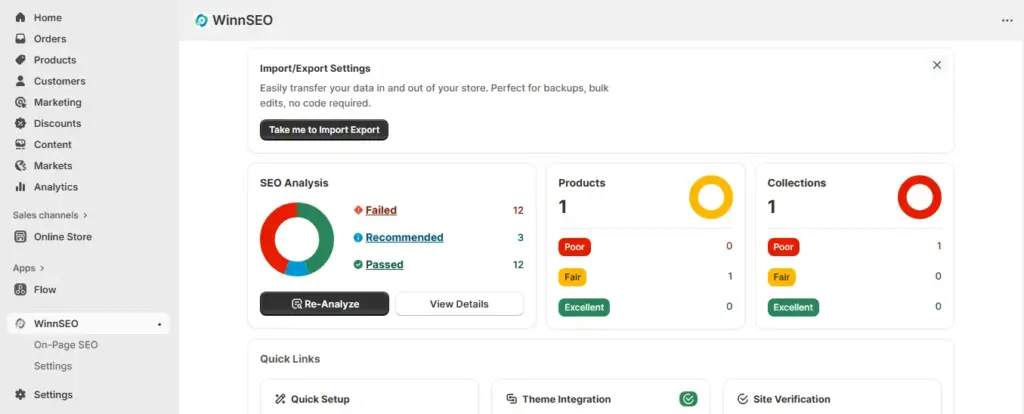
WinnSEO Dashboard
Done with the settings? Now, you’ll landed on the WinnSEO dashboard. You’re all set to use App as you wish.
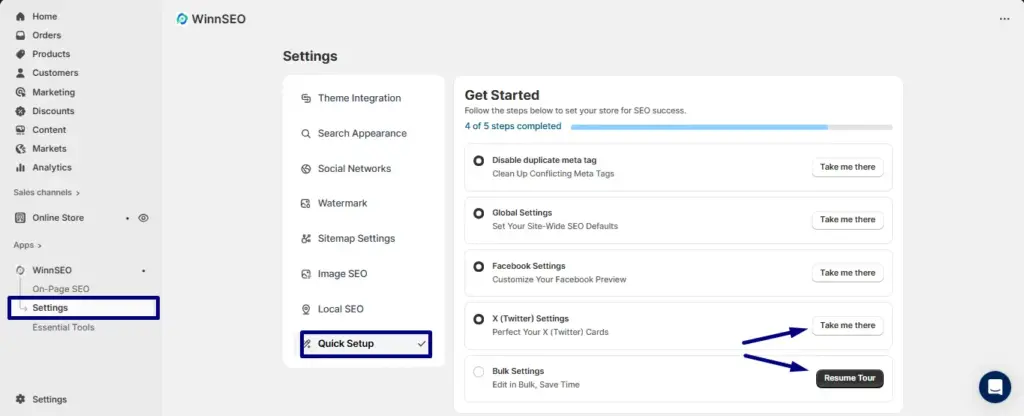
Quick Setup
You know how sometimes you want to quickly jump back to something you’ve already set up? Well, that’s exactly what Quick Setup in the Settings option is for! You can get a super fast recap of what you’ve done and what you’ve missed with Take me there button.
Plus, if you ever need to tweak something or just want to explore a setting you haven’t finished yet, just hit that Resume Tour button. It’s very simple!
Dive into WinnSEO and watch your online presence grow! Happy optimizing!